Machspace has a cosy sofa area, with its own wall-mounted zine holders in two sizes. In this post we’re publishing the Lightburn files so you can make one too.


First, download and unpack this zip file. It contains Lightburn files for the big zine library (holds A5 zines) and the small zine library (holds A6 zines), plus some photos to show you how it looks when it’s finished.
Tips
Screw holes
If you intend to attach it to the wall with screws, we recommend adding 3mm holes to the back panel design (just above the engraving of the bum-trumpet marginalia guy) so that you don’t have to drill holes in the zine library afterwards. We forgot and had to drill the holes after we assembled it and it was a faff!

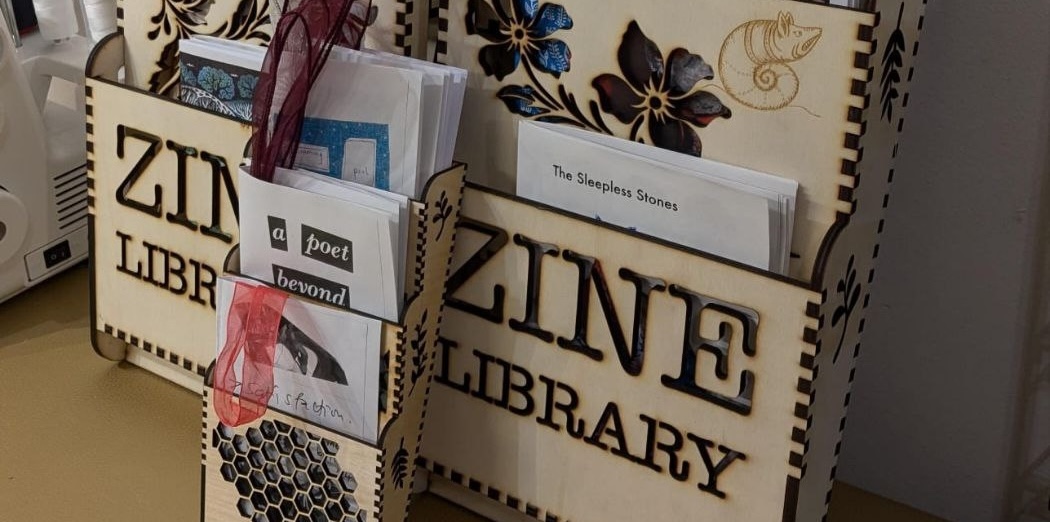
Cut-out text
For our “ZINE LIBRARY” text we chose a typewriter-style font for the ~zine aesthetic~ and then edited the letter shapes manually to add “bridges” that would make sure that the middles of letters like R and B wouldn’t just fall out completely when cut. The result is stencil-like:

This added a bit of work, so if you want to customise the text and would prefer to avoid that work I recommend choosing a font that is already stencil-ready, like Stick No Bills. Or just embrace the ~laser cutter aesthetic~ and just let the middles of the letters fall out! (You’ll see more of the zines that way, too.)
Assembly
Standard wood glue or even PVA should be fine. It’s fairly intuitive to put together, but do a trial assembly without glue first so you know what you’re doing. We used a clamp to hold it together by the sides while it dried, and that was sufficient.

Check speed and power settings
I have no idea whether Lightburn carries our speed and power settings over into your device! And your optimal settings will depend on exactly what you’re cutting, which can vary even between types of wood. Always make sure your speed and power settings are appropriate for the material that you’re cutting before you start.
A5 (large)
An A5 zine is made from A4 paper folded in half.
The large library is designed to be cut on 6mm plywood. The finished piece is 49.5 (H) x 24 (W) cm. If you change the sizes of any of the parts then the teeth will no longer slot together correctly on 6mm plywood.
Our laser cutter has a 300 x 600 mm bed, so we had to split the design into three files and therefore three cutting sessions. I’ve included those three files, and also a file that contains all the pieces. If you have a bigger laser cutter you’ll be able to rearrange all the pieces to fit efficiently onto your cutting bed.
A6 (small)
An A6 zine is a quarter of the size of an A4 sheet of paper.
This is designed to be cut on 3mm plywood. The finished piece is 24.8 (H) x 12 (W) cm. If you change the sizes of any of the parts then the teeth will no longer slot together correctly on 3mm plywood.
It’s half the size of the A5 zine library. It all fits onto our 300 x 600 mm cutting bed, so there’s only one file, which looks like this:

Credits
This design is a remix of another from TechShop / Instructables. Theirs is taller and has more pockets on it. Thank you, fellow nerds! ❤️⚙️